
Unlock the potential of your space by mastering the art of connecting IKEA Pax Wardrobes. This concise guide walks you through the simple yet effective steps to seamlessly link multiple wardrobes, transforming them into a unified and sophisticated storage solution. From aligning components to optimizing accessories, discover the key techniques to effortlessly join IKEA Pax units. Elevate your organizational prowess with this step-by-step guide, How To Connect Ikea Pax Wardrobes Together and also enhance the overall aesthetic and functionality of your living space.
Brief overview of Ikea Pax wardrobe
The Ikea Pax Wardrobe offers a versatile and customizable storage solution, renowned for its sleek design and modular components. With various options for shelves, drawers, and accessories, The wardrobe allows users to tailor their storage to specific needs. However, the true potential of the Pax system is unleashed when multiple units are seamlessly connected, creating a unified and expansive storage space.
Importance of connecting Pax wardrobes together
Connecting Ikea Pax Wardrobes together is crucial to maximize the available space and enhance the overall organization of your belongings. By joining these wardrobes, you not only increase storage capacity but also create a cohesive and aesthetically pleasing arrangement. This interconnected approach transforms individual into a comprehensive storage solution that adapts to your lifestyle.
Preparing for Connection
Before embarking on the connection process, thorough preparation is key. Begin by measuring the space where the wardrobes will be placed. Accurate measurements ensure a precise fit, preventing any awkward gaps or overcrowded corners. This step is essential for a seamless connection, allowing to integrate seamlessly into the designated area. A well-measured space sets the foundation for a visually appealing and functional arrangement of connected Pax wardrobes.
Measure the space for the wardrobes
To prepare for connecting Ikea Pax Wardrobes together, take inventory of the available accessories and components you intend to use. Ensure you have all the necessary connectors, screws, and brackets to facilitate a secure and stable connection. Organize the components in a systematic manner, making the assembly process smoother and more efficient. Adequate preparation guarantees that the connection process is not only hassle-free but also results in a durable and well-integrated storage solution that stands the test of time.
Determine the layout and configuration
Once the space is measured and preparations are in order, the next crucial step in connecting Pax Wardrobes is determining the layout and configuration. Consider the placement of shelves, drawers, and accessories to cater to your specific storage needs. This thoughtful layout ensures a harmonious integration of the wardrobes, optimizing both functionality and visual appeal.
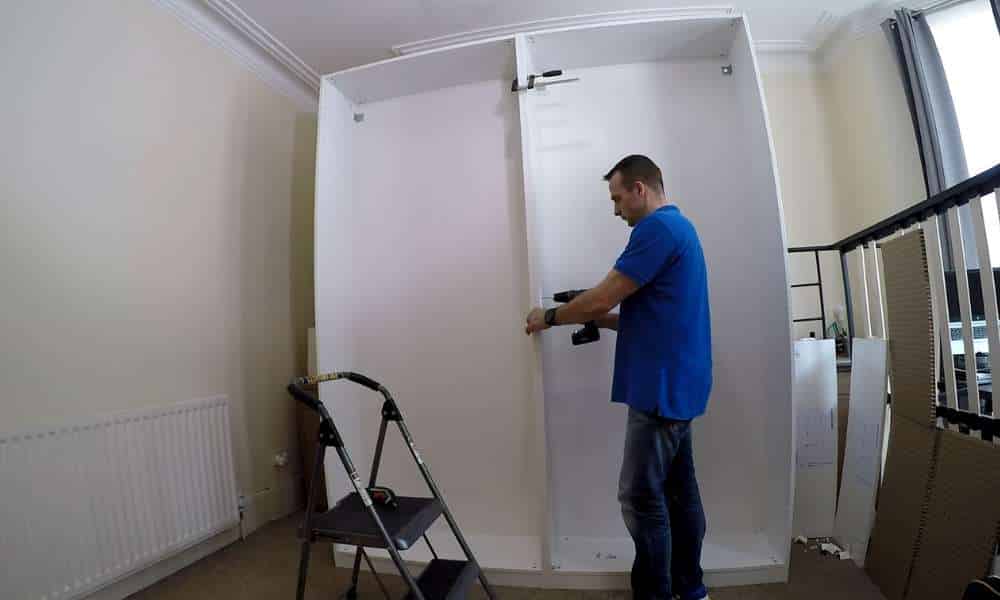
Connecting the Wardrobes
With the layout finalized, proceed to assemble each wardrobe according to the provided instructions. Following the guidelines meticulously ensures the structural integrity and stability of each individual unit. Pay attention to details such as securing shelves and attaching doors, ensuring a flawless assembly that sets the stage for a seamless connection.
Assemble each wardrobe according to instructions
Once assembled, align the Ikea Wardrobes side by side in the designated space. Precision is key during this step to ensure a snug fit and a continuous, streamlined appearance. Take the time to make adjustments as needed, guaranteeing that align seamlessly both vertically and horizontally. This meticulous alignment is essential for achieving a cohesive and polished look in your connected Pax wardrobe setup.
Align the wardrobes side by side
Connecting the wardrobes involves securing them together using the provided connectors and screws. Follow the instructions for connecting multiple units, making sure to anchor them firmly to create a stable and integrated storage solution. This step not only enhances the overall strength of the connected but also ensures they function as a unified system, providing a seamless and efficient storage experience.
Use safety brackets for stability
Ensuring the stability of your connected Ikea Pax Wardrobes is paramount, and safety brackets play a pivotal role in achieving this. These purpose-built brackets, provided by the manufacturer, serve to reinforce the structural integrity of the connected units. By securely attaching these safety brackets according to the guidelines, you add an extra layer of stability, preventing any potential wobbling or instability in your wardrobe configuration.
Secure the wardrobes to the wall
Taking safety measures further, it is essential to secure the connected wardrobes to the wall. This step is particularly crucial for taller configurations, minimizing the risk of tipping and ensuring the safety of both the furniture and its occupants. Following the recommended instructions and utilizing appropriate wall anchors and screws, you anchor each wardrobe firmly to the wall, providing additional support and peace of mind.
Finishing Touches
The finishing touches add the perfect aesthetic polish to your connected Pax Wardrobes. Implementing finishing panels is a key step to create a seamless and sophisticated look. These panels serve the dual purpose of concealing any gaps between and the wall, enhancing both the visual appeal and the overall cohesiveness of the connected Pax wardrobe system. Take the time to align and attach these finishing panels meticulously, achieving a refined and integrated storage solution that complements the aesthetics of your living space.
Add finishing panels for a seamless look
Completing the integration of your connected Pax Wardrobes involves adding the essential finishing panels. These panels not only contribute to a seamless appearance but also conceal any gaps between the wardrobes and the wall, providing a polished and cohesive look. Attaching these panels with precision enhances the overall aesthetic appeal, ensuring that your connected Pax wardrobe system seamlessly blends into the surrounding space.
Organize and customize the interior of the wardrobes
With the external elements perfected, turn your attention to the interior of the wardrobes. Organizing and customizing the storage space according to your needs is a crucial step in maximizing the functionality of your connected Pax units. Utilize the adjustable shelves, drawers, and accessories to create a personalized storage solution. This customization not only enhances the efficiency of your wardrobe but also ensures that every item has its designated place, contributing to a clutter-free and organized living space. Take advantage of the versatile Pax system to tailor the interior to your specific preferences, creating a wardrobe configuration that is both stylish and highly practical.
Conclusion
Connecting Ikea Pax Wardrobes transforms individual units into a unified and functional storage solution. By carefully measuring the space, following precise assembly instructions, and incorporating safety measures like brackets and wall anchoring, stability and safety are ensured. The addition of finishing panels contributes to a seamless and polished appearance. Customizing the interior further enhances functionality. This step-by-step guide empowers users to create an integrated Pax wardrobe system that not only maximizes storage but also elevates the aesthetic appeal of any living space.